

A few months ago, Logan competed in his first ever Jiu Jitsu competition in Oklahoma City. He had been practicing really hard for it so I wanted to show our support for him. Immediately, I thought of team t-shirts.

The search for matching t-shirts was harder than I had expected – I tried online and in stores. Shipping time was a huge issue as well, I didn’t have time to wait around plus I’m one of those people who don’t really like paying an arm and a leg for expedited shipping. So that option was out. Another issue I ran into was trying to find different size t-shirts in the same color. I know Gildan makes blank t-shirts in almost every color but since Grandma has keloid on her neck and chest, the crewneck would not be comfortable for her to wear. So, while I was going store to store trying to find blank V-necks, I decided to start working on the designs and then cutting them out which is the 2nd longest part of the project because it includes giving my sore index finger frequent breaks. Luckily though, I didn’t have a bad flare up at the time! The other longer part is waiting for the paint to dry – I use Tulip fabric paint and it dries within hours but I usually leave it overnight just to be safe.
Finding the mascot…
The first part of the design process was finding the perfect team mascot. I wanted a fierce creature so I came up with the tiger and eagle. After finding some cool tiger head images, I realized that Logan’s gym logo featured something similar. So back to square one of finding our mascot. Then while going through Google Images, I stumbled on a dragon illustration. I realized I had found our perfect mascot! The dragon plays a very significant part in Buddhism. Almost every pagoda in Myanmar has fierce dragon statues that guard Buddha. So, Logan and I chose the brave and fierce dragon as our Team Logan mascot!
Choose Freezer Paper…
After the saving the image onto my computer and settled on the font styles, I resized them according to the size of our t-shirts – I wear an XS/S, Grandma wears a medium and Madeline’s a 2T/3T. The next thing is to print it out on freezer paper. Reynolds Freezer Paper is used for keeping food such as meat or fish from getting freezer burns but I’ve used it only for t-shirting 😛 When I started custom t-shirting a few years back, I read somewhere that wax paper can be used as a substitute. That is a big NO! Wax paper and Freezer paper are two totally things. Wax paper is coated on each side with wax making it nonstick so it was no surprise when I ironed the paper it didn’t stick to the fabric. That was a big DUH moment for me. But in moments of desperation we will try anything right? Lol. Well, on the bright side I had plenty of wax paper to line the drawers in our new house. At that time, I was living in Okinawa and I searched the entire island but no luck anywhere.
So it MUST be freezer paper. It’s matte on one side and plastic-coated on the other. The matte side is where you will print your design while the plastic-coated side is ironed onto the fabric. I cut out my freezer paper to A4 sizes. I always take out all the paper from my printer and put in a single freezer paper in the tray at a time. If you put the freezer paper on top of your regular paper in the tray, it will most likely get crumpled up in the printer.

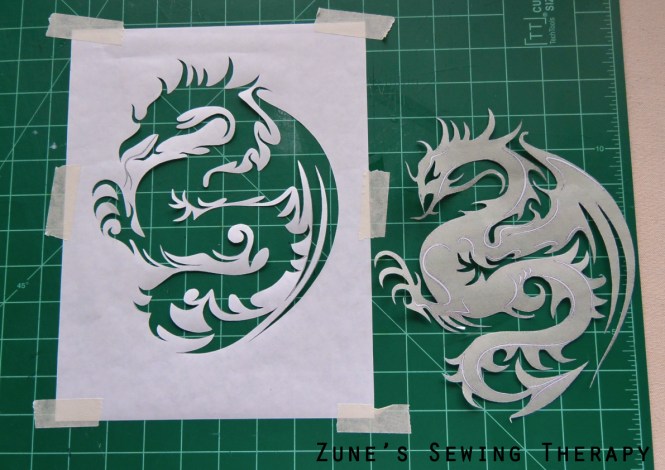
The cut…
After printing out the design, I taped the corners onto my self-healing cutting mat. I cut out only the colored part of the design with a craft knife. I usually skip tiny details like the eye, nostril and fine lines within the image – those can be easily added later in the painting process. When cutting out the design, make sure you are using a sharp blade and change it out if it gets dull otherwise it will tug at the paper and you won’t have a clean, precise line which can cause problems in the painting process such as the paint seeping under the paper or when you pull off the paper, you won’t have a clean line. It’s also easier to drag the knife towards you one line at a time. When I’m cutting a curve, I’ll keep the blade still and just move the mat around.

If you can’t find ‘em, make ‘em!
The matching t-shirts were taking way longer than I had planned so I decided it would be cheaper to make it myself and plus each of us would get the style that we wanted – short-sleeved scoop neck for Grandma, dress for Madeline and a long-sleeved crew neck for me. I added the mesh to the waist because I cut mine last and ended up not having enough fabric left but it turned out to be a cute design detail! I had gotten two yards of the solid black knit fabric from Joann. It feels slick and has a sheen to its surface. It held the paint surprisingly well. I made the garments based on our favorite t-shirts. For Madeline’s dress, I just added a gathered skirt.


After all the garments were done, it was time to do some ironing. Since I had texts and an image, I positioned them around the shirt before ironing them down. It’s better to iron one thing at a time. I always start with the one on the top and work my way down. Before we get to the painting, we need to put something inside the shirt so that the paint won’t seep through to the back. Anything hard with a smooth surface that is larger than the design should work so I pulled off the back of my sketch pad and then wrapped it with a plastic wrap. If you are painting both the front and the back of the t-shirt like me, do one side let it dry overnight and then work on the other side.
Making the fire…
I used 3 colors: red, orange and yellow. I painted orange all over first with a large brush then I dabbed some red around the edges here and there. I also like to brush inward. To blend the red into the orange a bit, I just dragged the brush towards the orange before I picked up more color on my brush. With a thin brush, I added the bright yellow in a zig zaggy motion. The trick is to keep it organic – think of the flickering and dancing flames in the fire. The last thing is to add the small details that were left out during the cutting.
Cleaning and waiting….

After the painting is done, leave the shirt on a flat surface to dry. I like to wash my brushes and palette straight away and then let them dry as well so they can be clean and ready for the next project. For me, peeling the freezer paper is the most exciting part! I’m like a kid on a Christmas morning dashing to the tree to open the presents. Start peeling from the corners towards the center. I use my craft knife to pick up the smaller pieces that were painted over. Always pull gently and avoid yanking the freezer paper off otherwise the paint will come off with it.
And that’s all to it! I’ve used this method to customize baby onesies to school projects for Logan – he had to wear a favorite university t-shirt to school and of course he wanted Harvard Medical School knowing that we live in Oklahoma. Lol. But as I always say “if you can’t find ‘em, make ‘em”! 😊

